--Video Guide--
-Watch to learn more about the exploration mode
--Written Guide--
Twilight Arbor Dungeon Guide
This Twilight Arbor dungeon guide for Guild Wars 2 includes basic info, a map for the location and strategies for both normal and explorable mode of the dungeon. Get your group to read this dungeon guide to assure yourself a smooth run through all of the objectives and boss fights in Twilight Arbor.
Basic Info
- Dungeon Name: Twilight Arbor
- Territory: Sylvari
- Location: Caledon Forest, Tarnished Coast
- Level: 50 in Story Mode, 55 in Explorable Mode
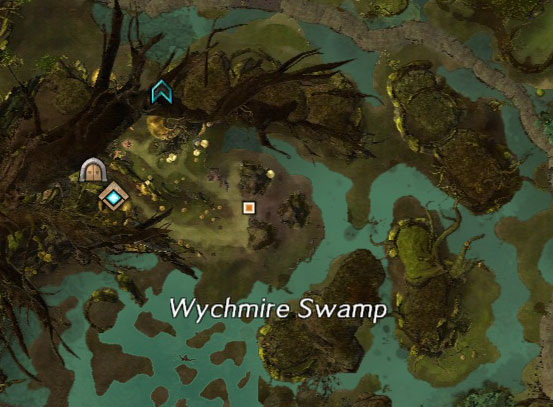
Map Location
Story (Level 50)
- Easy boss fights, takes about 45-60 minutes.
- Watch our for blossoms. Use them to rally.
- One person (caller) opens pods one by one. May contain hostile enemy.
- Unfortunately not much point to open them after this part.
- Bring condition removal to remove poison and immobilize.
- Pull enemy Knight away from mortars.
- Hugging left-side allows to skip it. Use ranged attack to deal with mortar. - Destroy mortars.
- Dodge when she charges.
- Bring stun-breaker in case you fail to dodge.
- Abuse Z-elevation for easy kiting, she doesn't know how to jump or fall.
- Do not cross the bridge! Instead just run forward through water to Necromancer and Ranger.
- This skips the second hardest encounter.
- He spawns exploding poison-gas spiders, keep circle-strafing.
- Try to stick together to keep spiders in one place. - Bring stun-breaker to remove fear.
- Bring condition removal to remove poison.
- He occasionally turns one party member to a cat -> kill dog to cure.
- Again caller opens pods.
- Throw essence at champion. - Champion is melee attacker with plenty of knockdowns.
- Caller picks either Z or E to focus.
- One person draws aggro of melees (L and R) and attempts to stay alive.
- Rest of the party deals as much damage as possible to bring target quickly down.
- Once target is down Faolain will attempt resurrect, damage her enough to prevent this.
- Repeat for remaining clones.
Explorable (Level 55)
- Path Up: Easiest boss fights, takes about 30-45 minutes.
- Path Forward-Up: Bit harder than Up, takes about 45-60 minutes.
- Path Forward-Forward: Easy, takes about 45-60 minutes.
- Pay attention to blossoms, don't unnecessarily kill them because you need them for rallying (switch target -> one hit -> rally).
- Champion spawns more wurms based on its health (75%, 50%, 25%). Focus veteran wurms, finish off Champion when it is at 25% health.
- Smash: Melee AoE with high damage. Knockbacks. "Big red circle".
- Dodge/Block. - Wells: Multiple AoE-projectiles with medium damage ticks. Only used at ranged targets.
- Stay in melee range if possible.
- Keep moving and dodge if needed. - Blossoms in area: AoE with medium damage when triggered. Inflicts Poison.
- Use to rally.
- Condition removal to remove Poison.
Malrona, Spider
- One player should pull ambushing spiders (3 groups) to tunnel.
- Malrona alternates between two attacks poison-spray and cluster-AoE.
- Poison-spray: Spray with medium damage ticks. Inflicts Poison.
- Side-step to avoid. - Cluster-aoe: Multiple AoE-projectiles with high damage.
- Stay behind if you are not targeted.
- Dodge 1-2 times (melee has to dodge based on animation). - After Malrona people usually skip most of the fights (may kill first spiders and start running when wurms show-up).
- If you want to skip discuss it with your team before-hand so you can prepare.
- Pull Fyonna away from eggs (touching spawns an enemy).
- After Fyonna people usually skip most of the fights. Go as a team and hug left wall.
- Keep distance to avoid mortars.
- Full offense.
- Kill Healing Seeds if possible.
Ambush
- After reaching dead Sylvari you get ambushed -> focus one side first.
- Dodge to remove Bee-debuff.
- Insects are invulnerable and will kill you in seconds.
- Get cloak from fountain and proceed while avoiding springs.
- Patience is the key. Slowly move forward while looking for the best way. - Bring mobility in case you get uncloaked and need to run for it.
- Insects disappear when someone proceeds far enough?.
- Attack Husk immediately and try to keep Leurent alive (meat-wall).
- Chaos Storm: AoE with high damage ticks. Inflicts random conditions.
- Dodge. - Chaos Armor (shield): Inflicts random conditions when hit.
- Stop attacking if needed. - Cloaks and teleports:
- She may still be there so keep hitting. - You can skip Archers after Boss.
- Stay maximum range to avoid spiders. Kill incoming spiders (don't let the Tree reset though).
- Heading to another "entrance" may be easier. - Right Smash: One target attack with low damage. Immobilizes. "Right hand smash".
- Left Smash: Delayed AoE with high damage. Inflicts 10? Vulnerability. "Left hand smash".
- 1-2 dodges.
Ambush
- After reaching dead Sylvari you get ambushed -> focus one side first.
- Walk through water to skip as in Story Mode.
- Archers have protecting bubbles which one-hit when touched. Use ranged, bring block to enter bubble or use portals (icon shows exit for every portal).
- Bug: Bubble remains few seconds invisible after Archer dies. - After this just carefully pull.
- Start: Melee-AoE with very high damage.
- Wait a bit before going melee. - Melee: Melee with ???
- Melees should stay behind. - Spawns Oakhearts. Melee: Melee with medium damage. Knockbacks. Roots: Roots with low damage ticks. Inflicts Immobilized.
- Kite and dodge.
- Alternatively one player may try to grab their aggro and just focus surviving.
