--Video Guide--
-Watch to learn more about the exploration mode
--Written Guide--
Caudecus’s Manor Dungeon Guide
This Caudecus’s Manor dungeon guide for Guild Wars 2 includes basic info, a map for the location and strategies for both normal and explorable mode of the dungeon. Get your group to read this dungeon guide to assure yourself a smooth run through all of the objectives and boss fights in Caudecus’s Manor.
Basic Info
- Dungeon Name: Caudecus’s Manor
- Territory: Human
- Location: Queensdale, Kryta
- Level: 40 in Story Mode, 45 in Explorable Mode
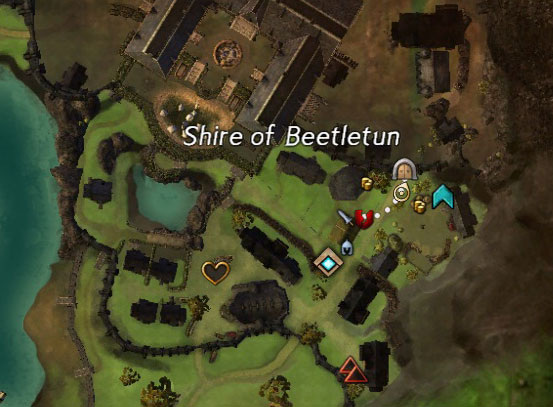
Map Location
Story Mode (Level 40)
Quite easy. Takes 30-45 minutes.
Prototype Golem
The adventurers must ask the party guests for clues, overcome Uzolan’s treachery, and rescue Queen Jenna from the human separatists who seek to destroy the human-charr efforts for peace.
Objectives and Boss FightsMeet Logan and the Queen in the Courtyard
This will start off the dungeon. Once you get to the courtyard you will be given more directions.
Talk to the guests and investigate the situation
You will need to talk to about a dozen party goers to investigate before the next part will start up. Split up and everyone speak with all the guests to move through this part quickly.
Defeat Uzolan’s Golem
After you investigate the guests Uzolan will call upon his Golem to try and defeat you. He will randomly charge up an attack and shoot missiles out at you. When you see him charging up run away and dodge when he shoots. This will one shot you if you get hit so pay attention. If you do go down just respawn and run back to the fight.
Find the Separatist’s and rescue the missing party goers
There will be an energy trail that you can follow through the mansion. This will lead you to a few fights against the separatists.
Defeat the Door Guard
Your first fight in the mansion will be against a door guard. He does a move similar to a thousand blades which you need to look out for. Move away when he does so. He also moves around a lot so it will be helpful to have immobilize abilities to make sure he stays away from the ranged classes.
Continue to the basement
After you defeat the door guard there will be a few mobs in the next room. They are not as powerful and you can AoE them down together. There are stairs that lead you to the basement of the mansion right next to the chest.
Find access to the hidden path
Once in the basement there will be more separatists to defeat. After doing so look for the glowing purple item on the wall in the back left corner. Interact with it and it will open a hidden passage.
Kill the Separatist Lieutenant
There will be a Separatist Lieutenant guarding the next door you need to go though. Ranged players should stay back and set traps if you have them. You can kite him down the path until he is dead.
Defeat High Level Separatist Mob
After this you will stumble upon a separatist mob that is plotting an evil plan. These NPCs are much stronger then some of the other mobs you have already went through so its important to have someone mark the targets and focus them down one by one.
Free the locked up NPC from the cage
At this point you will be outside of the mansion. There is a very large mob of separatists here so stay back and pull them slowly. There are also snipers on the tower you should keep your distance from but once you are down to the Separatist Lieutenant you can have someone go up there and aggro them. After this you will free the NPC from the cage who will lead you to the queen.
Free the Queen from the Separatists
This is the last part of the dungeon and you will need to take down 3 separatists and Captain Delanie to free the queen. Leave the captain for last and she will try to kill the queen who will shield herself. This will let you easily kill the captain without being targeted.
Prototype Golem
- Laser: 12 projectiles with no damage. Inflicts Vulnerability. Shoots Rocket after. "Puts arms behind".
- Rocket: Projectile with high damage. Used after Laser.
- Dual Rockets: Two projectiles with high damage. ???
- Fire Spin: AoE with medium damage ticks. "Spreads arms".
- Pull: Projectile with medium damage. Pulls. "Points right arm at you".
- Spin: Melee-channel with medium damage ticks (very high damage). Big range. Can't move but able to turn. "Glows".
- Slash: Melee with medium damage. Inflicts Bleeding.
- Ambush in next room, one player should enter and immediatelly fall back when hearing dialogue.
- After killing few enemies lots of additional enemies will arrive.
- Strongly suggest pulling!
- Be ready to fall back.
- Clear both groups before proceeding.
- Dogs cause knockdown (knocklock) and fear -> bring conditon removal, stun-breakers and stability.
- Pull enemies away from snipers.
- Melee snipers through floor.
- Kill normal enemies first.
The adventurers must ask the party guests for clues, overcome Uzolan’s treachery, and rescue Queen Jenna from the human separatists who seek to destroy the human-charr efforts for peace.
Objectives and Boss FightsMeet Logan and the Queen in the Courtyard
This will start off the dungeon. Once you get to the courtyard you will be given more directions.
Talk to the guests and investigate the situation
You will need to talk to about a dozen party goers to investigate before the next part will start up. Split up and everyone speak with all the guests to move through this part quickly.
Defeat Uzolan’s Golem
After you investigate the guests Uzolan will call upon his Golem to try and defeat you. He will randomly charge up an attack and shoot missiles out at you. When you see him charging up run away and dodge when he shoots. This will one shot you if you get hit so pay attention. If you do go down just respawn and run back to the fight.
Find the Separatist’s and rescue the missing party goers
There will be an energy trail that you can follow through the mansion. This will lead you to a few fights against the separatists.
Defeat the Door Guard
Your first fight in the mansion will be against a door guard. He does a move similar to a thousand blades which you need to look out for. Move away when he does so. He also moves around a lot so it will be helpful to have immobilize abilities to make sure he stays away from the ranged classes.
Continue to the basement
After you defeat the door guard there will be a few mobs in the next room. They are not as powerful and you can AoE them down together. There are stairs that lead you to the basement of the mansion right next to the chest.
Find access to the hidden path
Once in the basement there will be more separatists to defeat. After doing so look for the glowing purple item on the wall in the back left corner. Interact with it and it will open a hidden passage.
Kill the Separatist Lieutenant
There will be a Separatist Lieutenant guarding the next door you need to go though. Ranged players should stay back and set traps if you have them. You can kite him down the path until he is dead.
Defeat High Level Separatist Mob
After this you will stumble upon a separatist mob that is plotting an evil plan. These NPCs are much stronger then some of the other mobs you have already went through so its important to have someone mark the targets and focus them down one by one.
Free the locked up NPC from the cage
At this point you will be outside of the mansion. There is a very large mob of separatists here so stay back and pull them slowly. There are also snipers on the tower you should keep your distance from but once you are down to the Separatist Lieutenant you can have someone go up there and aggro them. After this you will free the NPC from the cage who will lead you to the queen.
Free the Queen from the Separatists
This is the last part of the dungeon and you will need to take down 3 separatists and Captain Delanie to free the queen. Leave the captain for last and she will try to kill the queen who will shield herself. This will let you easily kill the captain without being targeted.
Explorable (Level 45)
Start
Destroying parts
The beginning
Sure-Shot Seamus
- Each path take about 30-45 minutes. Dungeon has lots of hard-hitting enemies which can make it hard if you don't know how to counter them (condition removal for scouts, anti-projectile skills against pretty much everything else).
Destroying parts
- Go to cellar (as in story).
- Avoid pulling too much.
- First room contains only turrets, smash them.
- Reflect shots or use ranged attacks to kill riflemen. Avoid pulling Seamus.
- If you want to skip Seamus destroy remaining parts and run out (through him).
- If not, then destroy turrets and focus Seamus (he turns green before you can kill him so no loot).
- Seamus starts with pistols, swaps to shotgun at 90% health.
- Pistol Chain Shot: Multiple projectiles with medium damage (very high damage).
- Pistol Shoot: Projectile with high damage.
- Shotgun Shrapnel Blast: Cone with high damage. Knockbacks. "Stops briefly to aim".
- Stay behind him to avoid (keep circling), dodge if needed. Direct fire away from your team if possible.
- Stun-break to get out of knocklock.
- After cut-scene enemies spawn up in the barn. Hug left wall, get up and kill them first.
- One player may stay in cut-scene to give people time to get up. - Morgan does't move.
- Kick: Melee with high damage. Knockbacks.
- Try to dodge. - Throw Bomb: AoE-projectile with high damage. Inflicts 4 Vulnerability.
- Just side-step at high range, otherwise dodge. - Throw Bomb: Multiple medium range AoE-projectiles with high damage. Inflicts 4 Vulnerability. Only used at nearby targets. "Spins".
- Dodge.
- Stealths: Stuns (unblockable) and uses Backstab or uses Death Blossom.
- Backstab: Single-target melee with extremely high damage. "Stands still for a while".
- Stun-break for stun. - Death Blossom: Melee channel with medium damage ticks. Inflicts Bleeding. Evades.
- Dodge / remove conditions. - Slash: Fast single-target melee with high damage.
- Dodge. - Slash: Slower single-target melee with high damage.
- Dodge / run through.
- Destroy normal monsters from first group with hit&run-tactic.
- Skip rest of first group and whole second group by hugging left.
- One player should go first to trigger ambush. Lure them back to avoid aggroing everything. - Approaching/attacking two riflemen spawns 4 more riflemen.
- Kill them or use tactic above.
- Alternatively you can just skip everything and run to end-boss.
- Clean up turrets first. Focus golems when they wake up.
- Frost Jet: Spray with medium damage ticks (very high damage). Inflicts Chilled. Cannot rotate.
- Keep side-stepping and use dodges. - Whirldwind Attack: Slow projectile with medium damage. Turns you ice (unbreakable stun). Inflicts Chilled during effect. "Weird sound".
- Dodge. - Frost Aura: Shield which inflicts Chilled when hit.
The beginning
- Go inside house, go to stairs on left.
- Go rooms and push buttons (first on right, last on left)
- If you have problems you can melee some targets through walls. - When going back you get ambushed at stairs. Don't fight at stairs to avoid getting sniped.
- Front door closes, you can still get through corridor south of the building.
- Moving on floor causes spikes to damage you. Use carpets and pillows.
- Leap/teleport and stability can be used to quickly pass the room.
- When approaching waypoint watch out for ambush on left.
- Symbol of Faith/Wraith: AoE on her feet. Low damage ticks. Strong Burning. Self Regeneration/Retaliation.
- Difficult to melee unless bigger range.
- Targeted player should break line of sight (go behind tree) to pull her out of Symbol. - Pure/True Strike: Melee. Medium damage.
- Stay max-melee range if you want to melee. - Spawns Sword: Melee. Low damage.
- Ignore unless it is attacking. - You can skip hunting dog by taking alternative route.
- You need to have five kegs at the door to open it. Bandits carry them back.
- 1-2 players should kill trash monsters and randomly put kegs around (bait).
- Rest should just bring mobility (utility skills) and place kegs.
- If you have problems bring one keg to unreachable location (on table, etc.) and then sync drop 5 kegs without much threat.
- Enemies are stationary ranged attackers, attack them from range to limit damage.
- You can skip the big group by hugging cliff on right. - Pull champion away from big group.
- Lays wells: Delayed AoEs with low/medium damage ticks. Inflicts different conditions (Chilled, Poison, Weakness, Vulnerability).
- Avoid circles and bring condition removal.
- Reviving may be extremely difficult if you die on well. - Turns invulnerable and dashes: Multiple conditions on melee-range.
- Run away, dodge, block, etc.
- Abuse terrain. Run to tree-house and jump down, etc.
Sure-Shot Seamus
- Pull Silvers or focus them while one player kites Seamus around the house.
- Starts with pistols, swaps to shotgun at 90% health.
- Pistol Chain Shot: Multiple projectiles with medium damage (very high damage).
- Pistol Shoot: Projectile with high damage.
- Shotgun Shrapnel Blast: Cone with high damage. Knockbacks. Inflicts 4 Bleeding. "Stops briefly to aim".
- Stay behind him to avoid (keep circling), dodge if needed. Direct fire away from your team if possible.
- Stun-break to get out of knocklock.
- Pull melees. Destroy turrets.
- First room is crowded. Pull melee and destroy turrets before going in.
- Second room has only turrets.
- Reflect and use ranged attacks to kill rifle-men.
- Push "secret" button as in story-mode.
- Pick airgun, approach rocket turrets one by one and blow rockets back.
- Take it slow, no fancy running in tactics work. - Rocket Turret: AoE-projectile with very high damage.
- Pull/Focus Silvers.
- Kick: Melee with high damage. Knockbacks.
- Try to dodge. - Throw Bomb: AoE-projectile with high damage. Inflicts 4 Vulnerability.
- Just side-step at high range, otherwise dodge. - Throw Bomb: Multiple medium range AoE-projectiles with high damage. Inflicts 4 Vulnerability. Only used at nearby targets. "Spins".
- Dodge. - Traps get disabled when one player gets past the enemy group (run until you).
- To easily get past traps you should sent one player to closed gate before boss dies.
- Hug right and jump on rock to avoid first two groups.
- Even if you take aggro you can probably shake them off by going forward and jumping down. - When you jump down there is a room below. Approach two riflemen as a group and head inside.
- This forces riflemen (2 + 4 from spawns) to cluster up for AoE punishment.
- If your party still wipes you can pick off lone targets with ranged attacks.
- Alternatively you can just skip everything and run to end-boss.
- Melee players may go underwater and hit him from below.
- Earth Spikes still hits if there are normal melee players. - Vallog does't move.
- Earth Spikes: Melee with very high damage. Knockbacks. Inflicts 3 Bleeding. "Hops around".
- Dodge. - Fireball: Projectile with high damage. Inflicts Burning. "Fire-animation".
- Zig-zag at range, dodge at melee. - Reflecting Winds: AoE with no damage. Reflects projectiles. "Air-animation".
